Tag Archives: recipe

Creamy Green Spaghetti

PastaEver get a little ambitious shopping in the vegetable aisle and find yourself with produce that has to be used up ASAP? Well, I found some zucchinis and asparagus in my fridge today that needed to be eaten, but didn’t want to go with the old sautée stand-by. Then, I remembered a pasta recipe in Tyler Florence’s new book, Inside the Test Kitchen (which I highly recommend) that was squash-centric and used it as a basis for the dish below.

It turned out delicious and the execution was simple! The blended vegetables made a creamy, flavorful sauce that tasted decadent without any added dairy. The asparagus and pine nuts added great texture and flavor as did the basil and Parmesan. I used brown rice spaghetti to make it healthier, but feel free to use your favorite brand.

Zucchini Spaghetti
Serves 2-4

4 zucchinis, cut into 1/4″ slices
1 large onion, cut into 1″ pieces
2 garlic cloves, minced
1 bunch asparagus, trimmed, steamed and cut into 1″ pieces
1/4 cup pine nuts, toasted
Fresh basil
Parmesan
salt and pepper
olive oil
1lb. package spaghetti

  1. Heat olive oil in large sautée pan over medium-high heat, add all vegetables except for asparagus. Season with salt and pepper
  2. Cook until vegetables are soft, but not falling apart
  3. Add sautéed vegetables to blender and process until it becomes a smooth sauce
  4. Transfer sauce into a saucepan, re-season with salt and pepper if needed and keep warm over low heat
  5. Cook spaghetti al dente, drain, return to pot over medium heat, add sauce and asparagus, heat through
  6. Serve garnished with basil, Parmesan and pine nuts

My Favorite Chicken and Dumplings

chicken and dumplingsThis dish is on my top ten most crave-able food list as well as being one of my cousin, Hiep’s favorites.  His last response to my texting him a photo of the pot of chicken and dumplings I had stewing, “So, are you going to share the dumpling recipe or continue to torture me?” Alright! Alright! Here you go, Hiep.

I’ve experimented with several renditions of this classic over the years. The recipe below is by far my favorite one. This take elevates the standard boring chicken, gravy with oftentimes too gooey dough that passes as chicken and dumplings. It’s based on Thomas Keller’s Ad Hoc Chicken and Dumplings Soup. I’ve changed the the proportions of the ingredients so that it has a thick gravy rather than a soup base and is heartier overall, but retained the flavors. Why mess too much with a master’s recipe?

I usually roast a large organic chicken in the morning, serve the legs for lunch and save the rest for this recipe. The best, easiest and most versatile roast chicken recipe is the Thomas Keller one posted here. Do use the best chicken stock you can get if you’re not going to make it yourself. I like Pacific Organic and surprisingly the Costco Kirkland Organic Chicken Stock is good. Also, I’d keep Wondra flour on hand in case you like your gravy even thicker than I do and extra stock in case the opposite is true.

My Favorite Chicken and Dumplings

Chicken
Shredded meat from one medium roasted chicken, homemade or store-bought.
Reserve bones and skin for gravy.

Gravy
1 Tbsp. unsalted butter
1 cup thinly sliced carrots
1 cup coarsely chopped celery
1 cup coarsely chopped onion
1 cup coarsely chopped leeks
6 whole peppercorn
2 sprigs of thyme
2 Qt. (64 oz.) of good quality chicken stock
Reserved bones and skin from roasted chicken
10 Tbsp. butter
10 Tbsp. All purpose flour
kosher salt
freshly ground pepper
Champagne vinegar
1/4 cup of thinly sliced fresh chives

Dumplings
1 cup water
8 Tbsp. (1 stick) unsalted butter
1 Tbsp. kosher salt
1 1/3 cup all-purpose fl our
2 tsp. Dijon mustard
4 large eggs
2 heaping Tbsp. thinly sliced chives

Vegetables
8 stalks celery, peeled and thinly sliced
8 large carrots, peeled and cut into even bite-sized pieces
2 teaspoon honey
1 bay leaf
2 thyme sprigs
1 large garlic clove, crushed, skin on
6 black peppercorn
kosher salt

chopped flat-leaf parsley leaves to garnish

Gravy instructions

  1. In large pot, melt 1 Tbsp. butter over medium heat
  2. Add celery, carrots, onions and leeks and season with a little salt and fresh cracked pepper
  3. Lower heat, cover and cook for 30 minutes, stirring occasionally or until vegetables are softened
  4. Add stock, peppercorn, thyme, chicken skin and bones and bring to a simmer
  5. Cover and let simmer over low heat for 30 minutes
  6. Strain broth through a sieve into a heat safe dish, pushing on solids to get all the juices out
  7. Discard solids and set broth aside
  8. In your largest pot (this is where you’ll be combining your chicken, vegetables, dumplings and gravy), melt 10 Tbsp. of butter
  9. Add flour and cook over medium heat stirring the whole time until a you get a medium brown roux
  10. Whisk in stock and simmer over low heat for 10 minutes to thicken gravy, stirring occasionally
  11. Season while thickening with about 1 Tbsp. of Champagne vinegar, salt and fresh crack pepper to taste
  12. Optional- whisk in Wondra a little bit at a time for a thicker stock or broth to thin according to taste
  13. Take off heat, stir in chives and set aside

Dumplings instructions

  1. In medium saucepan, bring water, butter and salt to a simmer
  2. Add in flour all at once stirring vigorously to incorporate. A thick dough will form
  3. Cook over medium-low heat for an additional 3-5 minutes, stirring dough the whole time. A thin layer of dough will form in pan, this is normal
  4. Immediately move dough ball to a mixer bowl with a paddle attachment
  5. Mix on medium-high for 3 minutes to cool down dough
  6. Reduce speed to low and add one egg at a time, incorporating each egg completely before adding the next one
  7. Add mustard and chive and mix to combine
  8. Line a large cookie sheet with parchment paper
  9. In a large pot bring generously salted water to a strong simmer
  10. Using two soup spoons shape dough into quenelle shape (this instructional video comes in handy) and drop into simmering water
  11. Without crowding the pot with too many dumplings, simmer dough 5 minutes per batch to cook dough through
  12. With a slotted spoon, remove quenelles and let cool on parchment paper
  13. With a pair of scissors, trim any rough edges off dumplings
  14. Cover and set aside

Vegetable instructions

  1. In medium saucepan, bring salted water to a simmer
  2. Stir in celery and cook for 2 minutes or celery is al dente
  3. Strain through a sieve and rinse with cold water and set aside
  4. In medium pot filled halfway with cold water, salt generously and add carrots, honey, bay, thyme and peppercorns and bring to a simmer
  5. Cook for 3-5 minutes until carrots are cooked but still a little firm
  6. Drain water, discard bay, thyme and peppercorn and set aside

Serving

  1. Add chicken, dumplings, carrots and celery to gravy pot and bring to a low simmer and let cook for a few minutes to reheat
  2. Serve garnished with Italian parsley

A Taste of Saigon: Warm Beef and Watercress Salad

Beef Watercress SaladOne of the most memorable meals from our trip to Vietnam last year was at a restaurant called Cu Gach Quan (translates to ‘piece of brick’) in Ho Chi Minh City (Saigon).  The company was wonderful: Billy, my cousin Michelle and her husband Vinh. The restaurant was eclectic, but authentic. The cuisine was familiar and delicious Vietnamese comfort food, served on charming mismatched hand-made plates and bowls, with little dipping dishes of blue and white porcelain full of nuac mam (Vietnamese dipping sauce) and soy sauce. Fried tofu with crunchy garlic was served alongside sautéed local greens, braised sweet and spicy clay pot fish, brown rice and what turned out to be our favorite dish of the evening: bo xao sa lat song or warm beef and watercress salad.

Hot, garlicky, stir fried beef served on top cool peppery dressed watercress with tomatoes and marinated onion slivers. Delicious! Since traveling to Vietnam every time we craved this dish was not practical, I questioned our waiter and promised Michelle I’d come up with a recipe replicating this dish for us. Below, you’ll find what I came up with based on our server letting us in on the main marinade ingredients: garlic, lime and fish sauce.

If you ever find yourself in Ho Chi Minh City, I highly recommend you have at least one meal at Cu Gach Quan. Be sure to go to the original. We hear it’s better. They’re so popular, they opened one directly across the streetyes, really! In the meantime, try this recipe at home. It’s perfect with a bowl of jasmine rice.

Warm Beef and Watercress Salad (Bo Xao Sa Lat Song)
Serves 2-4 people

Stir fry beef
3 Tbsp. olive oil
2 Tbsp. fish sauce
½ tsp. black pepper
1 tsp. garlic powder
1 Tbsp. rice wine
1 lb. of thinly sliced beef, I prefer skirt steak, sirloin flap or hanger
1-2 Tbsp. of canola oil
3 garlic cloves, minced

Salad
1/2 tsp. sugar
1/4  tsp. salt
1/2 tsp. black pepper
1 Tbsp. lime juice
1 Tbsp. olive oil
1/2 medium red onion, thinly sliced (1/8″)
1 bunch watercress, washed
1 medium tomato, halved and slice

Garnish (optional)
fried garlic bits
fresh cracked pepper

  1. Mix first 5 ingredient together, stir in beef, allow to marinate, refrigerated for between 30 minutes to 2 hours
  2. About 10-20 minutes before serving, in a small bowl, mix sugar, salt, pepper, lime juice and olive oil together.
  3. Add onions to dressing. Do not let onions sit in marinate for more than 30 minutes, it will get too soft.
  4. Toss watercress in onion dressing.
  5. On a serving plate, layer watercress, then tomato slices on the outer edges of plate. The hot beef will go in the center of dish, on top of watercress. Avoid placing hot beef on tomatoes as they will get soft and lose their bite.
  6. Heat canola oil in wok over high heat until very hot.
  7. Add minced garlic, stir fry for 30 seconds.
  8. Add beef with marinate and stir fry for 3-5 minutes or until beef is cooked through.
  9. Serve beef over watercress, topped with pan sauce.
  10. Sprinkle with fried garlic and a few crack of fresh pepper.

Gruyère and Thyme Gougères

GougeresI love making gougères as appetizers for my dinner parties. They’re pretty easy to prepare and are always a hit. When my friends ask, “What are these?” and I usually just respond, “Cheese puffs!” Gougères seems to be such a formal name for something so fun and easy to eat.

My recipe is based on an old flyer that was meant to entice you to subscribe to Saveur Magazine. I still have the original copygrease stained and tornin a plastic sleeve, the kind you use to put in a three ring binder. Oddly, it features a portrait of a french writer holding a cat from the 1920s and two sentences about her as an introduction to these baked treats. The flyer never did succeed in selling me a subscription, but, I think the cute cat must’ve sold me on trying the recipe.

I’ve experimented a lot with this base recipe over the years. Below is my favorite variation. What I’ve learned from trial and error is NEVER open the oven while your gougères are baking. They will not bake up as big as they should. I like to bake mine one cookie sheet at time, since I can’t open the oven to rotate them and my oven won’t fit 2 sheets side-by-side. Better to slightly overbake than underbake, which will cause your puffs to deflate soon after they leave the oven and be a little gooey in the middle. Though even when these mistakes were made, no one seemed to notice and they were gobbled up anyway.

I like mine plain with thyme and gruyère, but have piped savory fillings into them as you would a cream puff or cut them in half to make little sandwiches. I’ve never been able to eat just one, and I bet you won’t be able to either.

Gruyère and Thyme Gourgères
Makes about 3 dozen

1/2 cup water
1/2 cup whole milk
5 Tbsp. butter
1 tsp. kosher salt
1/4 tsp. freshly ground black pepper
1/4 tsp. freshly ground nutmeg
1 cup all-purpose flour
1 cup grated gruyère cheese
1/2 tsp. fresh thyme leaves
4 eggs

Egg wash
1 egg
1 Tbsp. water

  1. Preheat oven to 400 degrees. Line 2 cookie sheets with parchment paper or silpat.
  2. In a medium sauce pan over medium-high, combine water, milk, butter, salt, pepper and nutmeg and bring to a boil.
  3. Reduce heat to low and stir to melt butter.
  4. As soon as butter is melted, add flour and stir vigorously  with a wooden spoon for about 1 minute to combine mixture and cook until dough pulls away from the side of the the pan.
  5. Remove from heat and stir in cheese and thyme. Keep mixing for 2 minutes or so to cool dough slightly before adding eggs. You can also move the dough to a stand mixer with a paddle for ease at this point.
  6. Incorporate eggs, one at a time into batter, making sure that each egg is incorporated completely before adding another.
  7. Spoon about a 1 1/2″ rounds of the dough onto your cookie sheet, setting them 2″ apart.
  8. In a small bowl beat egg and water together for egg wash.
  9. Brush the top of each gougère generously with egg wash. This will add shine and color to your puffs. Optionally, you can sprinkle a little grated cheese or a few thyme leaves on top before baking.
  10. Bake for 18-22 minutes or until gougères are golden brown.

Rhubarb & Co. Galette

Rhubard and Co. Galette
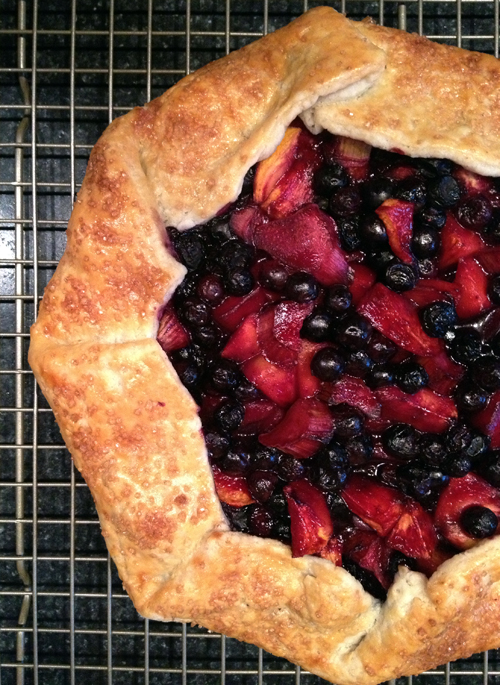
I’ve been trying to get in the habit of using up fresh foods in my kitchen before they go bad. A self-inflicted Iron Chef challenge. “Allez cuisine!” I found that it’s been a great way to challenge and expand my culinary skills. Today, my ‘secret’ ingredients were one ripe peach and a stalk of rhubarb. Really not enough fruit to make much of anything. But, luckily, I had a partial bag of frozen organic blueberries leftover from our Saturday morning pancakes too.

Taking inspiration from my friend, new mother and pastry chef, Sarah and a couple of blogs about galettes, I came up with the recipe below. Sarah was sweet enough to give me some pointers (that I noted in my recipe) after I tasted and became enamored with her ginger peach galette. Her pastry was a perfectly flaky, tender crust filled with slightly sweetened, spiced slices of peach with subtle bits of candied ginger interspersed throughout. The ginger and pepper elements in the recipe below are a take on her version as is finishing with the tart with turbinado sugar (aka sugar in the raw) to give it a little spark.

Lining the bottom of the galette with the almond meal mixture was influenced by the Rhubarb Galette recipe at Tasting Table. I liked the idea of bringing a nutty flavor in and keeping the bottom of the galette from getting soggy. I chose to incorporate the ginger in this layer of the pie as well. It’s less sticky to chop candied ginger into a flour/almond meal mixture than by itself.

The crust/pate brisée is an adaptation of several recipes and their techniques. I’ve struggled with making the perfect pie/tart crust for years and am finally coming close to mastering it. The Cook’s Illustrated recipe in the The Science of Good Cooking, The Food Lab’s post about the Science of Pie Dough and having Sarah video Skype with me while I was making this challenging dough, (Sarah directing, “No, not wet enough!”) has helped me come a long way. I doubt that Sarah is available for the masses via video chat, but, I’d highly suggest you check out the other sources. And I’ve convinced Sarah to let me video her techniques soon. I will share her wisdom!

Thankfully, this impromptu galette turned out delicious. Otherwise, this post would’ve been about the galette that might have been. The tart rhubarb was a compliment to the mellow berry flavor of the blueberry and peach. The ginger added a nice spice and the almond meal a subtle nuttiness. I’ll be making it this new recipe again soon. I hope you’ll enjoy it as much as we did.

Crust
8 oz. (1 1/2 cups) flour
4 oz. (8 Tbsp./1 stick) butter
2 Tbsp. vegetable shortening
½ tsp. salt
Equal parts cold water/vodka
1 beaten egg for brushing
Turbinado/Raw sugar

Almond layer
3 Tbsp. almond flour
1 Tbsp. sugar
1 Tbsp. flour
2 Tbsp. candied ginger

Filling
1 cup rhubarb, sliced
1 cup peach, cubed
2 cups blueberry, frozen
3 Tbsp. sugar
1 Tbsp. corn starch
¼ tsp. salt
¼ tsp. cinnamon
A couple cracks of fresh pepper
½ tsp. vanilla extract
1 tsp. Chambord or other raspberry liquor
1 tsp. lemon juice

Preparing the crust
Plan this part ahead as the dough will at minimum need to rest in the refrigerator for 1 hour. Preferably 2 or more for a tender crust. Sarah rests hers overnight for optimal tenderness. Also, all your fats and liquids should be ice cold. Freeze you butter and shortening as well your vodka. Though the vodka sounds like an odd choice. It’s tasteless and will cook off, but it will not encourage gluten development (like water), so it’s a great way to make the dough more pliable while avoiding the peril of a leathery shell. And the word on the street is work your dough as little as possible for a tender, flaky crust.

  1. In your food processor, pulse ½ (4 oz./1 cup) of flour and salt together.
  2. Add cold shortening, cubed butter and pulse for a few seconds until only lentil size pieces of fat remain.
  3. Add the rest of flour and pulse a couple of times to incorporate.
  4. Turn dough over into a large bowl.
  5. Sprinkle 2 Tbsp. of ice-cold water and 2 Tbsp. of cold vodka over mixture and fold in with a spatula. If dough is still dry and crumbly, alternately add water and vodka, 1 Tbsp. at a time, gently folding until dough has just come together. Dough should form into a ball easily, but, not be sticky.
  6. Shape dough into a round disc, about 1” thick and let rest in fridge for 1-2 hour or overnight.
  7. Flour your counter generously and turn out cold dough.
  8. A tip from Sarah for unfrayed edges: with the palm of your hand pound the edges of your dough disc. Forcefully pound then turn dough to a new section and work your way 2 to 3 times around.
  9. Another Sarah bit of wisdom regarding rolling the dough: roll only in one direction. Going back and forth will overwork your pastry.  It’s best to roll gently, turn the dough 1/8 to ¼ turn and repeat until desired thickness and size is achieved. The goal is to gently but quickly roll out dough without too much pressure. This should keep your dough flaky and tender and ensure a rounder shape.
  10. When dough is approximately a 13” plus round, trim excess to make a nice circle. I used a 13” pizza pan over my dough and trace around it with a knife.
  11. Check and repair any holes or broken edges so that filling doesn’t leak.
  12. Place your dough round on a cookie sheet lined with a Silpat or parchment paper. Let rest in fridge while you’re putting together the filling.

Assembling the galette

  1. Preheat oven to 400 degree with one rack on the bottom and one in the middle. If using a Breville Smart Oven, which I did, use bottom rack and bake on the parchment-lined pizza pan provided with oven.
  2. On a large cutting board, combine all the ingredients for the almond layer (almond flour, sugar, flour and candied ginger). With a large kitchen knife, chop ginger finely into mixture. Set aside.
  3. Place blueberries, peach and rhubarb in a large bowl.
  4. Sprinkle the rest of the filing ingredients (sugar, corn starch, salt, cinnamon, fresh pepper, vanilla extract, Chambord and lemon juice) over the fruit and with a spatula gently fold in, so that mixture is evenly incorporated, being careful not to bruise blueberries.
  5. Remove crust from fridge. Sprinkle almond mixture evenly on the bottom center of the shell, leaving a 3” edge.
  6. Top almond layer with fruit mixture, spreading evenly.
  7. To fold in edges of crust: fold, turn 1/8 of the way, and repeat until a nice pleat is achieved or roughly gather edges in for a more rustic look.
  8. Generously brush edges with beaten egg, getting wash into folded creases (this will help folds to stay put).
  9. Sprinkle exposed galette crust with raw sugar.
  10. Bake at 400 degrees for 15 minutes on the lower shelf of your oven to ensure a crispy bottom.
  11. Turn oven down to 350, move galette to center rack and bake for an additional 30-45 minutes until crust is golden brown and filling is bubbly.
  12. If fruit looks dry on top, use a pastry brush to spread liquid part of filling.
  13. Let galette rest for an hour on baking sheet or gently slide pastry over onto to a cooling rack and cool for a crisper bottom.
  14. Serve by itself, with fresh whipped cream or ice cream.
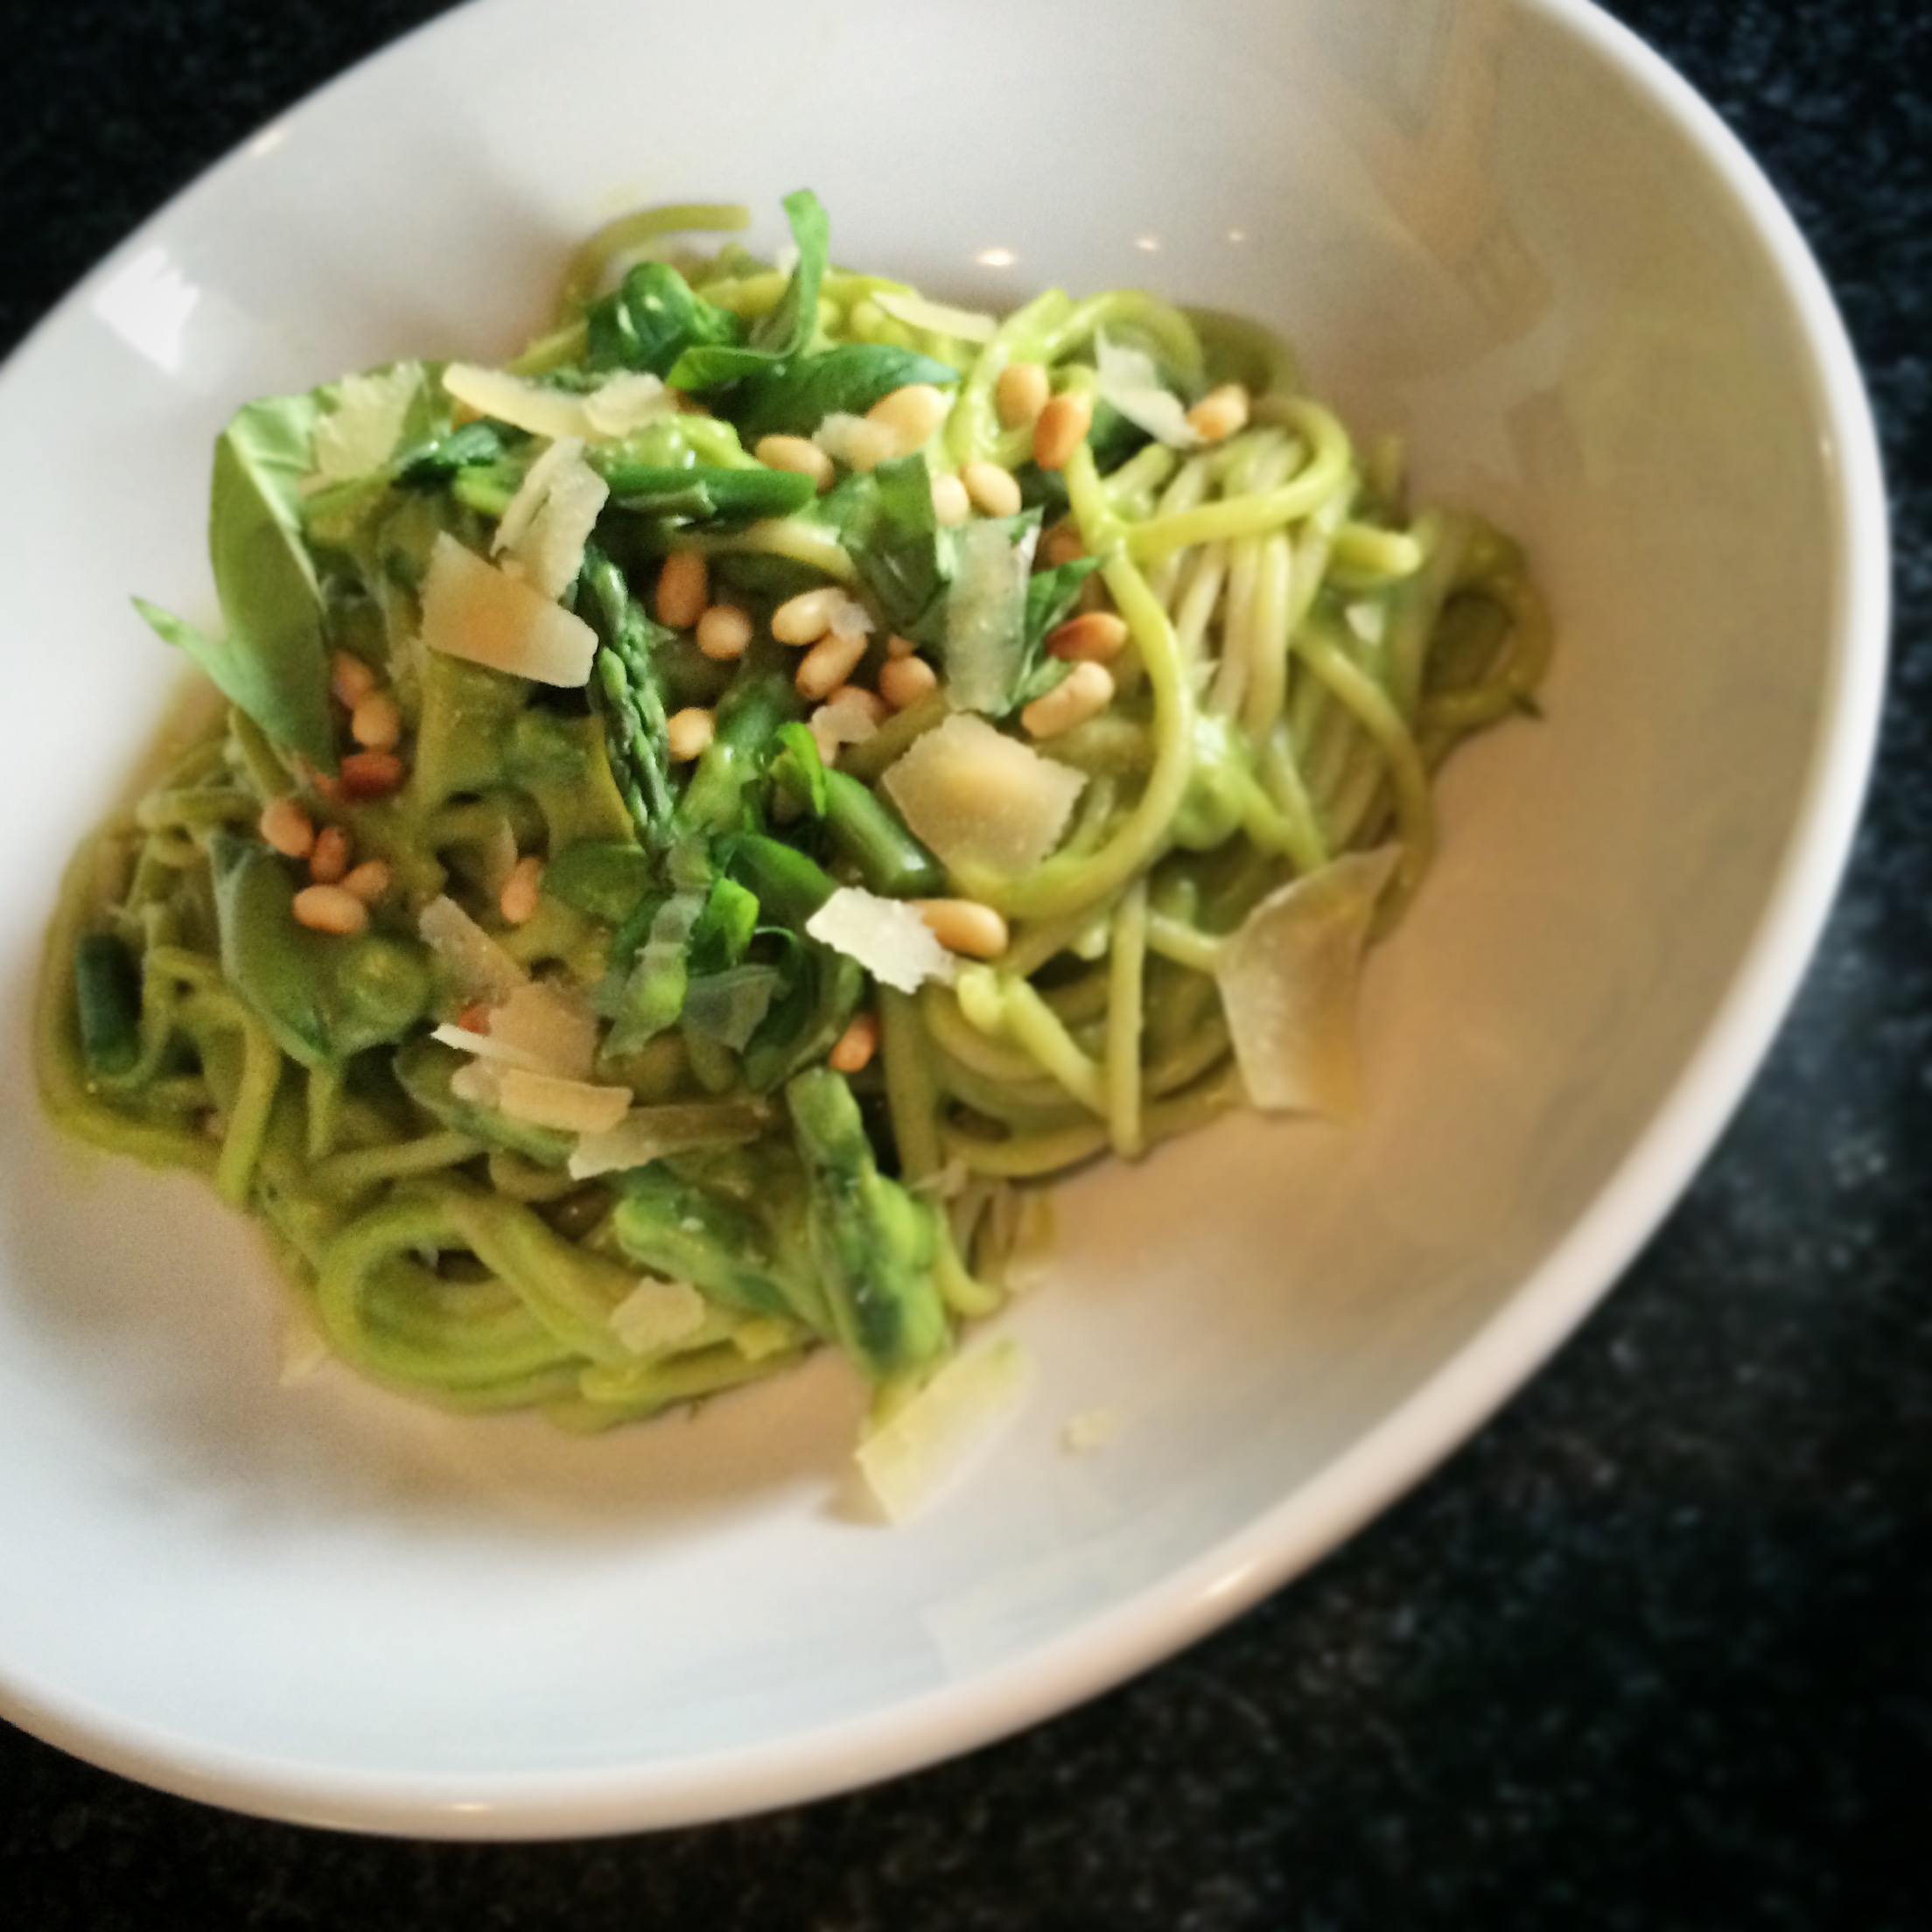