Banh Chung, a New Year’s Tradition

Chuc Mung Nam Moi! Happy New Year!

fullsizeoutput_474bWhen I was kid, a large part of my mother’s side of the family lived in Virginia. Our close knit Vietnamese clan would gather with great fanfare for the Lunar New Year. My cousins and I would line up to recite our new year’s wishes in our native tongue to my grandparents. Crossing our arms and bowing, we’d take turns, “Happy New Year! I wish you continued health, happiness and great wealth! May you live a long life!”

Ba Ngoai, my maternal grandmother, was always dressed in a beautiful silk traditional Vietnamese dress (ai do). Her gray hair pulled back in a neat chignon; her ears adorned with flat, round jade earrings with diamonds in the center. My grandfather, Ong Ngoai, wore a neat, brown wool suit. They sat together on comfortable armchairs in the center of the living room.

My parents, aunts and uncles flanked us with photo and video cameras. They cheered us on when we made our wishes and received our prized lucky red envelope full of money. Occasionally, peals of laughter erupted from the adults when one of us flubbed a word—being second generation, our Vietnamese was, and is, less than stellar—or expanded upon the traditional wish, “… I hope you have great wealth so you can share it with me!”

These warm family gatherings always included mountains of food. One of my favorite Tet (Lunar New Year’s) dishes is Banh Chung, a traditional sticky rice cake filled with mung bean and pork belly, wrapped in banana leaves and cooked. It’s time consuming to make, and seemed to only appear during this time of year. My grandparents made ours in their small apartment kitchen. Ong Ngoia used square wood frames that he’d made himself to shape them. Large pots would boil for hours to cook the square cakes, steaming up their home.

My grandparents lived a long life, as we wished for them. They eventually passed, surrounded by loved ones, and the Banh Chung that they shared with us in my childhood passed with them. So, a couple of years ago, I started to experiment with different recipes I found online. The ingredients are simple: banana leaves, marinated pork, mung bean and sweet rice. I like mine with loads of filling. Most that you can buy are rice heavy. The proportions below reflect my preferences. I like to soak my rice in coconut water. It’s not traditional, but it imparts subtle flavor that complements the banana leaves.

Building the cakes is a little more complicated, so I’ve included step-by-step photos. You’ll find YouTube videos of people free-hand building them. Ha! I tried that; it’s not as easy as it looks. It takes a lot of experience and dexterity to achieve a good looking banh. If your leaves are too soft, the whole thing will fall apart before you can tie it or wrap it together. It may end up looking like a blob. However, I’ve found a good ‘cheat’ that will make your life much easier. I use a square container lined with foil. I hope it helps you as it’s helped me.

Our family has now expanded and scattered across the world, so we no longer have these large gatherings for Tet. But my cousins and I are still very close, and our daily conversations always return to food. Banh Chung is an important topic this time of year: Where will you get yours? Can you send me one that you made? Recipe?

This one goes out to my family, and especially my cousins. Although we’re passing out red envelopes to our own children now, I’m glad that our love of food always keeps our conversations going and our mouths salivating. Chuc mung nam moi! Wishing you wealth, health and happiness, and a belly full of Banh Chung!

Banh Chung
Makes 4

2 Tbsp. fish sauce
1 tsp. black pepper
1/4 cup finely chopped shallots
1/2 Tbsp. honey
1 lbs. pork belly, cut in to 1/4″ thick, 2″ x 2″ pieces
4 cups sweet rice
4 cups coconut water
1 Tbsp. salt
1 1/2 cups mung bean (12oz bag)
banana leaves

The night before:

  1. In medium bowl, mix first 4 ingredients together, add pork and marinade overnight
  2. Rinse rice until water is clear, drain and in large bowl, soak in coconut water overnight
  3. Rinse mung bean until water is clear and cover with water (water should rise 1″ above beans) in large bowl to soak overnight
  4. Clean banana leaves by soaking and rinsing
  5. Cut a letter size sheet of paper down to 8.5″x8.5″ to make template
  6. Using scissors make 16 pieces (you’ll need 4 of these for each cake) of 8.5″ x 8.5″ banana leaves. Fold them down to 4.25″ square. Cut and additional four 3″ banana leaves squares. Dry with paper towels, wrap or store in plastic bag and refrigerate until ready to use.

Assembly

Note: I like to divide my rice, meat and mung bean into 4 even portions for each cake. I’ve tried figuring out cup measurements for each cake, but it changes depending on how long the rice soaks etc. I’ve accidentally shortchanged the last assembled piece before. This makes it a lot easier.
  1. Drain rice completely and mix with salt and divide into 4 portions.
  2. Drain mung bean and divide in to 4 portions
  3. Divide pork into 4 portions, setting aside leftover marinade for use
  4.  Cut eight 18″ long pieces of aluminum foil
  5. Line a 4″x4″ or a little bigger square cake pan or container (I use a square glass Pyrex style) container with a sheet of foil, lenght-wise
  6. Unfold a banana leaf square and refold into a box corner like so:
    img_4367img_4368
  7. Insert into foiled lined mold, lining piece up with corner:
    img_4366
  8. Repeat for each corner until you’ve created a box. Pictured here with 2 corners:
    img_4365
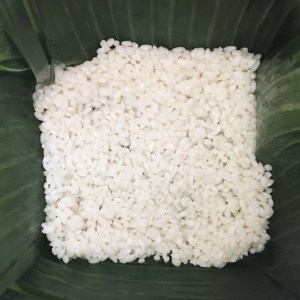
  9. Fill the bottom of the banana leaf box with 1/3 of 1 portion of the rice and push the rice with a spoon to the side to make a 1/4-1/2″ lip, while maintaining rice at the bottom to make an inset for mung beans:
    img_4375
  10. Put 1/2 of one portion of mung bean on top of rice, leaving 1/4″-1/2″ around the edges
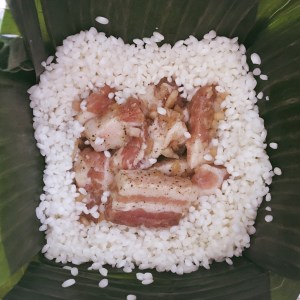
  11. Top with portioned pork and 1/4 of leftover marinade (marinade and pork fat will help to flavor the mung beans):
    img_4374
  12. Fill edges with 1/3 of portioned rice, scooting the rice with a spoon to make a little well around pork for mung beans:
    img_4373
  13. Fill well and top pork with the other half of the mung bean, leaving a 1/2″ around beans for rice:
    img_4372
  14. Fill edges with rice and cover mung bean with remainder of rice:
    img_4371
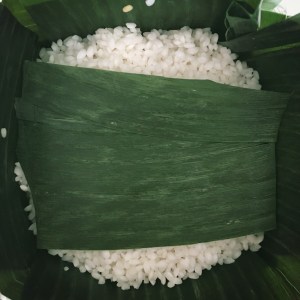
  15. Top with a piece of the square leaf:
    img_4370
  16. Fold in edges of banana leaf box and tightly fold foil over:
    img_4369
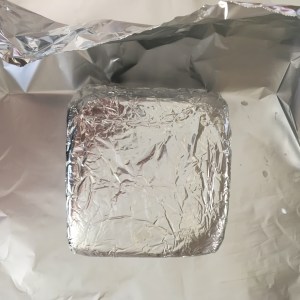
  17. Invert over another sheet of foil and wrap tightly:
    img_4359
  18. Tie cakes together with kitchen twine, string wrapped around once on each side (like a gift)
  19. When all cakes are made, cover as many as will fit in your pot with water in your Instant Pot or traditional pressure cooker
  20. For Instant pot cook on high pressure for 1 hour 30 minutes and keep warm (natural release) for another 1 hour 30 minutes.
    For pressure cooker, follow instructions to secure cover and bring to highest pressure. Over the lowest heat on your stove to maintain pressure, cook for 2 hours and 10 minutes
  21. Follow manufacturer instructions to release pressure from your Instant Pot or traditional pressure cooker
  22. Pull cakes out with tongs, letting them drain for a minute and set on rimmed cookie sheets to cool for 2 hours
  23. Unfoil and tightly wrap with Saran wrap, patting cakes back into square shape. Refrigerate until ready to serve

To serve banana leaves are removed and typically cakes are sliced and pan fried in a little oil (right photo) and served with Vietnamese pickled vegetables and a little fish sauce to dip. We’ve been known to eat them warm, an hour after cooling (left photo). Not very traditional, as the cake doesn’t hold it’s shape, but we love the soft, almost gooey tender rice and fall-apart fatty pork and the soft savory mung beans. 


Lastly, a tip from my mother: wrap your knife in a layer of plastic wrap when cutting. Your slices will come out sharply cut and your knife easy to clean. Enjoy!

Praline Pecan Butterscotch Oatmeal Cookie

Pecan cookiesPraline pecan butterscotch oatmeal cookie! It’s a mouthful to say, but ooey gooey and delicious! If a cookie and a pecan pie had a baby, I imagine this would be it!

On a recent trip to New Orleans, we became addicted to Donald Link’s Cochon Butcher restaurant. We spent a week having lunch there everyday. How could we resist menu items such as Le Pig Mac? On the second day, I decided to try one of the their cookies. Oatmeal Pecan Butterscotch! OMG! One of the best cookies we’ve ever had!

I was immediately in search of the recipe. Alas, Google did not turn up a Donald Link or Cochon Butcher Oatmeal Pecan Butterscotch cookie recipe. However, I came home to a the new Milk Bar Life cookbook which contained Christina Tosi’s Grandma’s oatmeal cookie recipe. I used that as a starting point for my version of the cookie I fell in love with. With a lot less granulated sugar, but keeping all the brown sugar for the caramelley flavor and other tweaks: Ta Dah! A wonderful ode to the Cochon Butcher cookie.

Don’t even think of replacing the praline pecans with plain pecans. That’s what makes the cookie! The praline will turn into delicious goo when baked, you’ll see 🙂

Cookies
14 Tbsp. unsalted butter, room temperature
3/4 cup packed light brown sugar
1/4 cup granulated sugar
1 1/2 tsp. vanilla extract
2 large eggs
1 1/2 cup all purpose sugar
1 1/2 cup old-fashioned rolled oats
1 tsp. kosher salt
1 tsp. baking soda
3/4 cup of butterscotch chips
1 1/2 cup praline pecan (recipe follows)
1 cup powdered sugar

Praline Pecans
1/2 cup packed light brown sugar
1/4 cup granulated sugar
1/2 tsp. salt
1/4 cup heavy cream
2 tablespoons unsalted butter
2 tablespoons water
2 cup pecan halves

Praline pecans instructions

  1. In a small heavy-bottomed saucepan, combine all ingredients except for pecans
  2. Place over medium-high heat and stir constantly with a wooden spoon until mixture reaches the softball stage, 238 to 240 degrees
  3. Pull the pan off of the stove and add pecans
  4. Continue to stir the candy vigorously until the candy cools, and the pecans have a nice thick coating of the praline
  5. Spread the praline pecan out in a single layer on a parchment, foil or Silpat lined cookie sheet
  6. Cool completely and break into individual pecan pieces before using in recipe

Cookie instructions

  1. In a large bowl, combine flour, oats, salt and baking soda
  2. Combine butter, sugars and vanilla in the bowl of a stand mixer fitted with a paddle attachment
  3. Cream together for 3-5 minutes on high until light and fluffy, stopping mixer and scraping sides down with a spatula occasionally
  4. Add eggs one at a time, mixing for a minute after each addition to thoroughly combine
  5. Reduce speed to low, add flour mixture and mix until combined, about 30 seconds
  6. Add butterscotch chips and praline pecan and mix for another 30 seconds until well distributed throughout dough
  7. Scoop about 2 Tbsp. of dough onto a parchment, foil or Silpat line sheet. Place scoops right next to each other. You won’t bake them just yet
  8. Cover and cool dough balls for 30 minutes in refrigerator (this will make it easier to work with)
  9. Preheat oven to 375 degrees (350 if convection)
  10. Put confectioner’s sugar in a large bowl.
  11. Roll each dough ball between the palm of your hands and gently roll each piece in confectioner’s sugar to coat
  12. Place cookies about 2” apart on parchment, foil or Silpat lined cookie sheet
  13. Bake for 13-16 minutes until golden brown and crackled
  14. Cool for 5 minutes before moving from the baking sheet

Creamy Green Spaghetti

PastaEver get a little ambitious shopping in the vegetable aisle and find yourself with produce that has to be used up ASAP? Well, I found some zucchinis and asparagus in my fridge today that needed to be eaten, but didn’t want to go with the old sautée stand-by. Then, I remembered a pasta recipe in Tyler Florence’s new book, Inside the Test Kitchen (which I highly recommend) that was squash-centric and used it as a basis for the dish below.

It turned out delicious and the execution was simple! The blended vegetables made a creamy, flavorful sauce that tasted decadent without any added dairy. The asparagus and pine nuts added great texture and flavor as did the basil and Parmesan. I used brown rice spaghetti to make it healthier, but feel free to use your favorite brand.

Zucchini Spaghetti
Serves 2-4

4 zucchinis, cut into 1/4″ slices
1 large onion, cut into 1″ pieces
2 garlic cloves, minced
1 bunch asparagus, trimmed, steamed and cut into 1″ pieces
1/4 cup pine nuts, toasted
Fresh basil
Parmesan
salt and pepper
olive oil
1lb. package spaghetti

  1. Heat olive oil in large sautée pan over medium-high heat, add all vegetables except for asparagus. Season with salt and pepper
  2. Cook until vegetables are soft, but not falling apart
  3. Add sautéed vegetables to blender and process until it becomes a smooth sauce
  4. Transfer sauce into a saucepan, re-season with salt and pepper if needed and keep warm over low heat
  5. Cook spaghetti al dente, drain, return to pot over medium heat, add sauce and asparagus, heat through
  6. Serve garnished with basil, Parmesan and pine nuts

Delicious and Healthy: Garam Masala Quinoa Chicken Salad

quinoaAfter two weeks of non-stop travel and eating out, we were craving something healthy. Don’t get me wrong, we ate good… Oh. So. Good! There’s nothing like southern food! That’s a story for another post. Recommendations to come soon!

I came up with this recipe a couple of years ago. I was challenged to come up with something for an elimination diet I was doing. No dairy, no eggs, no pork or red meat, no wheat, no sugar, no white rice …the list goes on. The idea is to not eat anything that you might be allergic to and then slowly reintroduce food groups. It wasn’t easy, but it forced me to cook out of my comfort zone and rely more on spices for flavor.

The recipe below came out of that period and is a mainstay during our hot Tucson summer and whenever we need a break from heavy foods. It’s flavorful and hearty. You won’t miss the carbs. It can be served hot or cold. I personally think it’s tastier at room temperature. Also, if you’re feeling lazy, buy the pre-cut pre-washed bagged kale from Trader Joe’s. Enjoy!

Salad
1 ½ cup quinoa
2 cups chicken broth
1 cup water
3 cloves garlic, minced
1 bunch kale, stripped from stem and cut into 1″ pieces
1 can (15 oz.) garbanzo bean, drained
2 skinless, boneless chicken breast
Canola or vegetable oil
salt
pepper

Dressing
1 lime, juice of
3 Tbsp. olive oil
1 Tbsp. garam masala
1/4 to 1/2 tsp. kosher salt
1/4 tsp. fresh cracked pepper

Garnish
1 avocado, halved, pitted and sliced
¼ cup Italian parsley, thinly sliced

  1. In saucepan, combine quinoa, chicken broth, water and salt to taste (Alternatively: cook in a rice cooker on the white rice setting)
  2. Bring to a boil, lower heat and simmer, covered for 15 minutes or until all liquid is absorbed
  3. Set aside
  4. Split chicken breasts. Season with salt and pepper
  5.  In skillet, over medium-high heat, add 1 Tbsp. oil until hot
  6. Add 1 minced garlic clove and cook for 30 seconds
  7. Add chicken breast to skillet. Cook 3-4 minutes on each side or until done
  8. Remove chicken from skillet, let cool and shred
  9.  Add another tablespoon of oil to same skillet, add remaining garlic and cook for 30 seconds
  10.  Add kale with a little salt and pepper and sautée for approximately 3 minutes or until soft
  11.  Add garbanzo beans to kale mix and warm in pan for 2 minutes
  12.  In small bowl, mix dressing ingredients together
  13.  In large bowl, combine quinoa, kale mix, dressing and chicken. Season with additional salt and pepper to taste if necessary
  14. Serve warm or cold, garnished with avocado and parsley

My Favorite Chicken and Dumplings

chicken and dumplingsThis dish is on my top ten most crave-able food list as well as being one of my cousin, Hiep’s favorites.  His last response to my texting him a photo of the pot of chicken and dumplings I had stewing, “So, are you going to share the dumpling recipe or continue to torture me?” Alright! Alright! Here you go, Hiep.

I’ve experimented with several renditions of this classic over the years. The recipe below is by far my favorite one. This take elevates the standard boring chicken, gravy with oftentimes too gooey dough that passes as chicken and dumplings. It’s based on Thomas Keller’s Ad Hoc Chicken and Dumplings Soup. I’ve changed the the proportions of the ingredients so that it has a thick gravy rather than a soup base and is heartier overall, but retained the flavors. Why mess too much with a master’s recipe?

I usually roast a large organic chicken in the morning, serve the legs for lunch and save the rest for this recipe. The best, easiest and most versatile roast chicken recipe is the Thomas Keller one posted here. Do use the best chicken stock you can get if you’re not going to make it yourself. I like Pacific Organic and surprisingly the Costco Kirkland Organic Chicken Stock is good. Also, I’d keep Wondra flour on hand in case you like your gravy even thicker than I do and extra stock in case the opposite is true.

My Favorite Chicken and Dumplings

Chicken
Shredded meat from one medium roasted chicken, homemade or store-bought.
Reserve bones and skin for gravy.

Gravy
1 Tbsp. unsalted butter
1 cup thinly sliced carrots
1 cup coarsely chopped celery
1 cup coarsely chopped onion
1 cup coarsely chopped leeks
6 whole peppercorn
2 sprigs of thyme
2 Qt. (64 oz.) of good quality chicken stock
Reserved bones and skin from roasted chicken
10 Tbsp. butter
10 Tbsp. All purpose flour
kosher salt
freshly ground pepper
Champagne vinegar
1/4 cup of thinly sliced fresh chives

Dumplings
1 cup water
8 Tbsp. (1 stick) unsalted butter
1 Tbsp. kosher salt
1 1/3 cup all-purpose fl our
2 tsp. Dijon mustard
4 large eggs
2 heaping Tbsp. thinly sliced chives

Vegetables
8 stalks celery, peeled and thinly sliced
8 large carrots, peeled and cut into even bite-sized pieces
2 teaspoon honey
1 bay leaf
2 thyme sprigs
1 large garlic clove, crushed, skin on
6 black peppercorn
kosher salt

chopped flat-leaf parsley leaves to garnish

Gravy instructions

  1. In large pot, melt 1 Tbsp. butter over medium heat
  2. Add celery, carrots, onions and leeks and season with a little salt and fresh cracked pepper
  3. Lower heat, cover and cook for 30 minutes, stirring occasionally or until vegetables are softened
  4. Add stock, peppercorn, thyme, chicken skin and bones and bring to a simmer
  5. Cover and let simmer over low heat for 30 minutes
  6. Strain broth through a sieve into a heat safe dish, pushing on solids to get all the juices out
  7. Discard solids and set broth aside
  8. In your largest pot (this is where you’ll be combining your chicken, vegetables, dumplings and gravy), melt 10 Tbsp. of butter
  9. Add flour and cook over medium heat stirring the whole time until a you get a medium brown roux
  10. Whisk in stock and simmer over low heat for 10 minutes to thicken gravy, stirring occasionally
  11. Season while thickening with about 1 Tbsp. of Champagne vinegar, salt and fresh crack pepper to taste
  12. Optional- whisk in Wondra a little bit at a time for a thicker stock or broth to thin according to taste
  13. Take off heat, stir in chives and set aside

Dumplings instructions

  1. In medium saucepan, bring water, butter and salt to a simmer
  2. Add in flour all at once stirring vigorously to incorporate. A thick dough will form
  3. Cook over medium-low heat for an additional 3-5 minutes, stirring dough the whole time. A thin layer of dough will form in pan, this is normal
  4. Immediately move dough ball to a mixer bowl with a paddle attachment
  5. Mix on medium-high for 3 minutes to cool down dough
  6. Reduce speed to low and add one egg at a time, incorporating each egg completely before adding the next one
  7. Add mustard and chive and mix to combine
  8. Line a large cookie sheet with parchment paper
  9. In a large pot bring generously salted water to a strong simmer
  10. Using two soup spoons shape dough into quenelle shape (this instructional video comes in handy) and drop into simmering water
  11. Without crowding the pot with too many dumplings, simmer dough 5 minutes per batch to cook dough through
  12. With a slotted spoon, remove quenelles and let cool on parchment paper
  13. With a pair of scissors, trim any rough edges off dumplings
  14. Cover and set aside

Vegetable instructions

  1. In medium saucepan, bring salted water to a simmer
  2. Stir in celery and cook for 2 minutes or celery is al dente
  3. Strain through a sieve and rinse with cold water and set aside
  4. In medium pot filled halfway with cold water, salt generously and add carrots, honey, bay, thyme and peppercorns and bring to a simmer
  5. Cook for 3-5 minutes until carrots are cooked but still a little firm
  6. Drain water, discard bay, thyme and peppercorn and set aside

Serving

  1. Add chicken, dumplings, carrots and celery to gravy pot and bring to a low simmer and let cook for a few minutes to reheat
  2. Serve garnished with Italian parsley

A Taste of Saigon: Warm Beef and Watercress Salad

Beef Watercress SaladOne of the most memorable meals from our trip to Vietnam last year was at a restaurant called Cu Gach Quan (translates to ‘piece of brick’) in Ho Chi Minh City (Saigon).  The company was wonderful: Billy, my cousin Michelle and her husband Vinh. The restaurant was eclectic, but authentic. The cuisine was familiar and delicious Vietnamese comfort food, served on charming mismatched hand-made plates and bowls, with little dipping dishes of blue and white porcelain full of nuac mam (Vietnamese dipping sauce) and soy sauce. Fried tofu with crunchy garlic was served alongside sautéed local greens, braised sweet and spicy clay pot fish, brown rice and what turned out to be our favorite dish of the evening: bo xao sa lat song or warm beef and watercress salad.

Hot, garlicky, stir fried beef served on top cool peppery dressed watercress with tomatoes and marinated onion slivers. Delicious! Since traveling to Vietnam every time we craved this dish was not practical, I questioned our waiter and promised Michelle I’d come up with a recipe replicating this dish for us. Below, you’ll find what I came up with based on our server letting us in on the main marinade ingredients: garlic, lime and fish sauce.

If you ever find yourself in Ho Chi Minh City, I highly recommend you have at least one meal at Cu Gach Quan. Be sure to go to the original. We hear it’s better. They’re so popular, they opened one directly across the streetyes, really! In the meantime, try this recipe at home. It’s perfect with a bowl of jasmine rice.

Warm Beef and Watercress Salad (Bo Xao Sa Lat Song)
Serves 2-4 people

Stir fry beef
3 Tbsp. olive oil
2 Tbsp. fish sauce
½ tsp. black pepper
1 tsp. garlic powder
1 Tbsp. rice wine
1 lb. of thinly sliced beef, I prefer skirt steak, sirloin flap or hanger
1-2 Tbsp. of canola oil
3 garlic cloves, minced

Salad
1/2 tsp. sugar
1/4  tsp. salt
1/2 tsp. black pepper
1 Tbsp. lime juice
1 Tbsp. olive oil
1/2 medium red onion, thinly sliced (1/8″)
1 bunch watercress, washed
1 medium tomato, halved and slice

Garnish (optional)
fried garlic bits
fresh cracked pepper

  1. Mix first 5 ingredient together, stir in beef, allow to marinate, refrigerated for between 30 minutes to 2 hours
  2. About 10-20 minutes before serving, in a small bowl, mix sugar, salt, pepper, lime juice and olive oil together.
  3. Add onions to dressing. Do not let onions sit in marinate for more than 30 minutes, it will get too soft.
  4. Toss watercress in onion dressing.
  5. On a serving plate, layer watercress, then tomato slices on the outer edges of plate. The hot beef will go in the center of dish, on top of watercress. Avoid placing hot beef on tomatoes as they will get soft and lose their bite.
  6. Heat canola oil in wok over high heat until very hot.
  7. Add minced garlic, stir fry for 30 seconds.
  8. Add beef with marinate and stir fry for 3-5 minutes or until beef is cooked through.
  9. Serve beef over watercress, topped with pan sauce.
  10. Sprinkle with fried garlic and a few crack of fresh pepper.

Christina Tosi is a Genius!!!

An endorsement for the Milk Bar Cookbook

MilkBarI was introduced to Milk Bar cookies a couple of years ago when a box arrived at our door as a gift. Individually wrapped in cellophane were cookies named Compost, Corn, Blueberries & Cream and Cornflake. These were familiar names for things such as muffins and breakfast cereal, but these were very exotic flavors for cookies.

Perplexed, Billy and I inspected each cookie carefully before tasting. “Hum, feels soft and chewy… What’s this on the ingredient list? POTATO CHIPS??? Huh? …” Well, we were sold after the first bite. All the flavors were strangely familiar and comforting. The Compost cookie was a perfect combination of sweet and savory. The love child of the classic chocolate chip and of any and all (it seems) the snack foods you could think of. Chips, pretzels, butterscotch, even coffee! The Corn cookie tasted like what cornbread would be if it were reincarnated as a dessert. We finished half the box in short order and froze the rest for special occasions.

When we ran out of cookies, I looked for the Compost Cookie recipe online and made a batch. I  portioned and froze half the dough so that I could bake a few at a time in my Breville oven when the craving struck. After piece-mealing Milk Bar recipes from here and there, and finding that they produced cookies as good as the ones from the bakery, I decided it was time to buy the book…

Momofuku Milk Bar Cookbook is a revelation. Christina Tosi, author of this book as well as chef, owner, and founder of Momofuku Milkbar is a mad, mad genius. The cookbook is full of wonderful desserts that could’ve come from the imagination of a child wearing a unicorn t-shirt on a Lucky Charms sugar high.  Her monologues are friendly and whimsical and recipes exactdown to the gram—with thorough directions. There’s a whole section of what specific ingredients to buy, and where, as well as an equipment guide. A technique section: “the ten minute creaming process, or why milk bar cookies are so damn good.”  Ms. Tosi is a woman after my OCD heart!

I’ve had a great time learning and baking from this book. It’s really inspired me to use unusual ingredients, to be more inventive and has improved my baking. Outside of a minor conversion typogelatin sheet to powder—which caused a runny banana cream pie and a loose batch of panna cotta (in book 1 1/2 sheet silver gelatin= 3/4 tsp. powder. Should be 1 1/2 tsp.), the Momofuku Milk Bar Cookbook is a joy. I’d recommend to new and experienced bakers alike.

Gruyère and Thyme Gougères

GougeresI love making gougères as appetizers for my dinner parties. They’re pretty easy to prepare and are always a hit. When my friends ask, “What are these?” and I usually just respond, “Cheese puffs!” Gougères seems to be such a formal name for something so fun and easy to eat.

My recipe is based on an old flyer that was meant to entice you to subscribe to Saveur Magazine. I still have the original copygrease stained and tornin a plastic sleeve, the kind you use to put in a three ring binder. Oddly, it features a portrait of a french writer holding a cat from the 1920s and two sentences about her as an introduction to these baked treats. The flyer never did succeed in selling me a subscription, but, I think the cute cat must’ve sold me on trying the recipe.

I’ve experimented a lot with this base recipe over the years. Below is my favorite variation. What I’ve learned from trial and error is NEVER open the oven while your gougères are baking. They will not bake up as big as they should. I like to bake mine one cookie sheet at time, since I can’t open the oven to rotate them and my oven won’t fit 2 sheets side-by-side. Better to slightly overbake than underbake, which will cause your puffs to deflate soon after they leave the oven and be a little gooey in the middle. Though even when these mistakes were made, no one seemed to notice and they were gobbled up anyway.

I like mine plain with thyme and gruyère, but have piped savory fillings into them as you would a cream puff or cut them in half to make little sandwiches. I’ve never been able to eat just one, and I bet you won’t be able to either.

Gruyère and Thyme Gourgères
Makes about 3 dozen

1/2 cup water
1/2 cup whole milk
5 Tbsp. butter
1 tsp. kosher salt
1/4 tsp. freshly ground black pepper
1/4 tsp. freshly ground nutmeg
1 cup all-purpose flour
1 cup grated gruyère cheese
1/2 tsp. fresh thyme leaves
4 eggs

Egg wash
1 egg
1 Tbsp. water

  1. Preheat oven to 400 degrees. Line 2 cookie sheets with parchment paper or silpat.
  2. In a medium sauce pan over medium-high, combine water, milk, butter, salt, pepper and nutmeg and bring to a boil.
  3. Reduce heat to low and stir to melt butter.
  4. As soon as butter is melted, add flour and stir vigorously  with a wooden spoon for about 1 minute to combine mixture and cook until dough pulls away from the side of the the pan.
  5. Remove from heat and stir in cheese and thyme. Keep mixing for 2 minutes or so to cool dough slightly before adding eggs. You can also move the dough to a stand mixer with a paddle for ease at this point.
  6. Incorporate eggs, one at a time into batter, making sure that each egg is incorporated completely before adding another.
  7. Spoon about a 1 1/2″ rounds of the dough onto your cookie sheet, setting them 2″ apart.
  8. In a small bowl beat egg and water together for egg wash.
  9. Brush the top of each gougère generously with egg wash. This will add shine and color to your puffs. Optionally, you can sprinkle a little grated cheese or a few thyme leaves on top before baking.
  10. Bake for 18-22 minutes or until gougères are golden brown.

Bacon + Chicken + Cream = Goodness

Tarragon ChickenMy early childhood was spent in Grenoble, France, where dinner at my parents’ friends house happened weekly. Our friend Marie-France’s specialty was Poulet a l’Estragon (Tarragon Chicken): a whole cut up chicken, braised in a mixture of bacon, crème fraiche, white wine and tarragon. It was a childhood favorite of mine. Who can resist creamy, bacon-ey chicken?

Last week, my cousin, Michelle, asked me for a new way to cook chicken thighs. I modified the original tarragon chicken recipe to be less fatty and yet retain the strong chicken flavor that you get from braising a whole bird.

If you’d like to cook a whole cut-up chicken the way Marie-France used to make it, modify the recipe below by adding 3 slices of bacon, adjusting the wine to 1 1/2 cup, changing the crème fraiche/cream to 2 cups and no chicken broth. Since there’s so much cream in the whole chicken version of the recipe, making a roux to thicken the sauce is unnecessary.

I reduce my chicken broth to about 2/3. I like my tarragon chicken with a little rice one the side and french bread. Bon appétit!

Poulet a l’Estragon/Tarragon Chicken with Bacon

3 slices thick smoked bacon (I use applewood), cut into 1/2″ pieces
6 chicken thighs
2 tsp. fresh chopped tarragon or 1 tsp. dried
1 cup dry white wine
2 cups reduced chicken broth
1/4 cup crème fraiche or heavy cream
salt and pepper
Champagne vinegar

Roux
1 Tbsp. butter
1 Tbsp. flour

  1. In Dutch oven, cook bacon over medium heat until crispy. Transfer bacon to paper towel lined plate to absorb fat.
  2. Brown chicken (no salt and pepper, bacon will add salt to dish) in bacon fat over medium-high heat.
  3. Remove chicken from pot and discard all fat.
  4. Deglaze pan with white wine.
  5. Add cream, tarragon, chicken broth, chicken and bacon to pot, braise covered at a low simmer for 25-30 minutes or until chicken is cooked through, turning chicken halfway through cooking.
  6. Remove thighs from pot and pour sauce into a heat safe dish.
  7. Melt butter in pan over medium-high heat. Add flour and stir to combine.
  8. Cook roux, stirring the entire time until it is lightly colored, 2-5 minutes.
  9. Add reserved sauce and cook for 2-3 minutes over medium heat until sauce is thickened.
  10. Re-season with salt and pepper and a dash or two of Champagne vinegar as needed.
  11. Add chicken back to pot to reheat.

A Comforting Bowl of Vietnamese Beef Stew (Bo Kho)

stewWinter inspires stews. This dish is one that I grew up with. An Asian beef stew with lemongrass, star anise, cinnamon and even a little curry for seasoning. Every Vietnamese family I know has their own version of it. Some like the sauce almost broth-like and served over rice noodles, garnished with cilantro, Thai basil and jalapeño slices. Others like it plain, with a side of baguette. Try the combination that suits your palate best.

I prefer my sauce thicker and a little more intense. After it’s cooked, I let my stew sit overnight in the refrigerator. This allows the flavors to meld into the tender beef and veggies and for the fat to separate and harden. I discard the latter before I reheat it. I find that it the fat doesn’t really add anything and dilutes the flavor. I serve mine in a shallow bowl, with a few Thai basil leaves and french bread for dipping.

Half a dozen years ago, a craving for Bo Kho struck me and I called my mom long distance to Vietnam for instructions. It was dictated to me in our traditional family way, with ingredients being approximated—a little of this, a dash of that— and, of course, I was told to taste and re-taste. Over the years, I dialed in the ingredients and proportions and kept notes of my changes and the result is the recipe below.

Vietnamese Beef Stew (Bo Kho)
Serves 4-6

2 whole star anise
2 1.5” pieces of whole cinnamon
2 Tbsp. vegetable or canola oil
3 medium shallots, minced
3 cloves garlic, minced
2 stalks lemongrass, 2″ pieces, bruised
2 to 2 ½ lbs. beef chuck roast or pot roast cut into 2” cubes
2 tsp. curry powder (Vietnamese style preferable)
4 bay leaves
1-6 oz. can tomato paste
3-5 Tbsp. hoisin Sauce (according to taste)
4 medium carrots, cut into 1” pieces
2 medium turnips, cut into 1.5” pieces
Beef broth
Salt, pepper, white wine vinegar and honey to taste
Thai Basil to garnish

  1. Toast cinnamon and star anise. I do it directly on my flat top electric on high heat, very carefully, until darkened. It takes less than 2 minutes. You can also use a hot pan over high heat. Set aside when done.
  2. In large pot (I use a Dutch oven) over medium-high heat, add oil, shallots, garlic and lemongrass, cook for 1-2 minutes until shallots are transparent.
  3. Reserve one piece of lemongrass, you’ll use at the very end to freshen up the lemony flavor of the stew.
  4. Add beef to pot, season with salt, pepper and half of curry powder. Cook, stirring intermittently, until beef is browned.
  5. Add just enough broth to cover beef. Stir in ¾ of tomato paste and 3 Tbsp. of hoisin sauce. Add bay leaves, 1 star anise and 1 cinnamon stick (you’ll add the remaining anise and cinnamon at the end to give the flavor a pop).
  6. Bring to a boil, lower heat, cover and let simmer for 1 ½ hours.
  7. You can check flavor and re-season according to taste after the first 30 minutes. Sparingly add salt, pepper, hoisin sauce, honey (1 tsp at a time), vinegar (a dash at a time for acidity) tomato paste and curry powder as needed. If you’re re-seasoning throughout the simmering process, let flavors develop for 15 minutes before re-tasting.
  8. Check beef for tenderness. Beef should be close to desired tenderness before vegetables are added. If beef is not as tender as wanted, cover and simmer for an additional 15-30 minutes.
  9. Add carrots, turnips and additional broth if liquid does not cover veggies. Cover and cook for an additional 30 minutes or until vegetables tender.
  10. Let stew cool to room temperature and refrigerate overnight.
  11. About half an hour before serving, remove as much coagulate fat from the top of the stew as you can (or leave it – up to you).
  12. Add reserve cinnamon, star anise and lemongrass and bring to a low simmer over medium heat. Let simmer for at between 15-30 minutes to warm through and to steep the newly added spices. Remove the cinnamon and anise after a few minutes if you feel the flavors are getting too intense for your taste.
  13. Serve topped with basil and with fresh baguette slices.